Original Link: https://www.anandtech.com/show/5549/msi-big-bangxpower-ii-x79-review-a-world-of-novelty-heatsinks
MSI Big Bang-XPower II X79 Review – A World of Novelty Heatsinks
by Ian Cutress on February 25, 2012 3:00 PM EST- Posted in
- MSI
- Motherboards
- X79
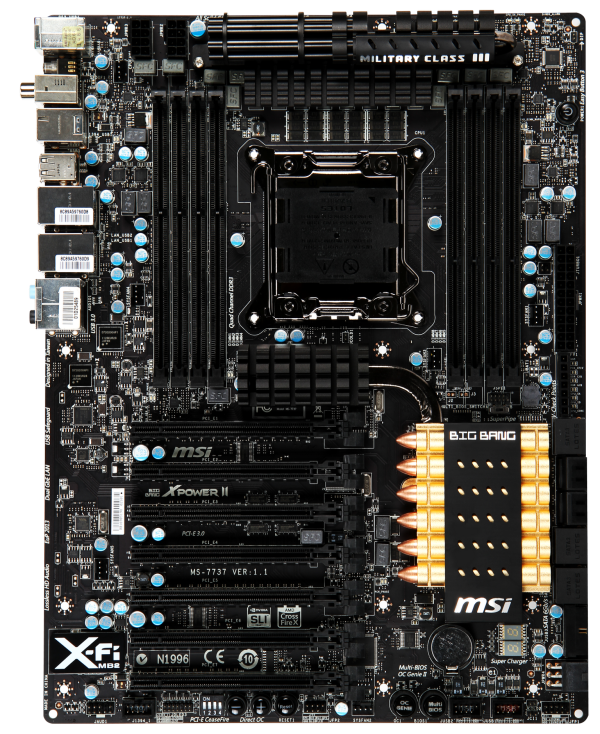
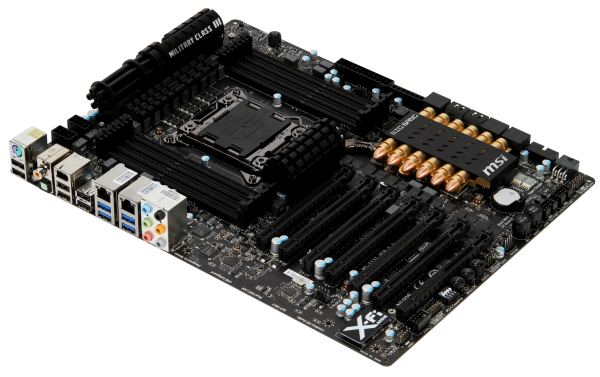
The cream of the MSI enthusiast range is the Big Bang series – in P55 we got the Trinergy and the Fuzion, for X58 we were treated to the XPower, in P67 there was the Marshal, and now with X79 MSI has graced us with the XPower II in the loosely defined XL-ATX form factor. Due to the increased size of the board (in length), the consumer is treated to seven PCIe slots, running at x16/x8/x8/x8 in full quad-GPU mode. This is also alongside some novelty heatsink design in the shape of a Gatling gun for the VRMs and rounds in an open magazine for the chipset. MSI even try and pull a sneaky one in the BIOS settings for better default performance depending on which BIOS you use.
Overview
The XL-ATX form factor in this instance gives the board another inch (~2.5 cm) in length to cater for the seven full length PCIe slots on board. This obviously means that it will struggle to fit in cases which strictly adhere to ATX specifications. There are also other benefits to a motherboard this size – MSI has added a large number of optional buttons for overclockers (voltage points, on-the-fly overclocking), and two extra SATA controllers for a total of six SATA 6 Gbps ports (10 SATA total). The USB 3.0 header is at right angles to the board in between the SATA ports, leading to a more efficient way of using the included USB 3.0 front panel in the box.
Out of the box, if you are lucky, MSI has been sneaky with their default BIOS options. Normally, as per Intel specifications, when an i7-3960X is used, the Turbo arranges the CPU speed at 3.9 GHz for single threaded loads, and 3.6 GHz for multi-threaded loads, and speeds in-between. On this MSI board, there is a BIOS option called ‘Turbo Enhance’, and when enabled, gives 3.9 GHz in all scenarios. Technically your CPU is not guaranteed to work at these speeds, and it should also void your warranty (as any overclock should), but it does give the user more performance if the board is just to plug in and go.
Network users will rejoice, with dual Intel network interfaces (82569V and 82574L) which should have added some cost to the board. This is in comparison to the audio, which is only the ALC898 – typically boards in this price range sport either this or a non-Realtek solution, meaning the MSI is only staying with the crowd on this one. The BIOS on offer is very simple to use and a big leap beyond MSI’s previous offering (you may recall my MSI P67 review, where the BIOS had games), with every option simply laid out and easy to find for both normal users and overclockers. I did have a slight issue with the BIOS, in that the first time I applied an XMP profile at 2400 MHz (16 GB kit) it worked fine, but the next day it would not load the OS on that BIOS at all (even at default settings).
In the box materials are abundant, and the board comes with a standard three-year warranty (even when using Military Class III parts and a Gatling gun as a heatsink). Overall, this board was fun to use and, despite the heatsink design, is good to look at. Due to the high-end nature of the product, I can see overclockers may want to take advantage of the 22 phase power delivery, and multi-GPU users enjoying x16/x8/x8/x8.
Visual Inspection
I could keep mentioning the military styling, attempting to draw parallels to Gigabyte’s Sniper and Assassin series – but these are essentially more for aesthetics than ultimate cooling ability. The gun as part of the VRM heatsink does increase surface area but probably hampers air flow, whereas the chipset heatsink feels as if it is made from plastic, perhaps why it is connected to another heatsink below the socket.
The top heatsink hides an extensive 22-phase CPU power delivery, which at peak (note, liquid nitrogen used by overclockers most likely) will require both the two eight-pin 12V connectors to the top left to be able to deliver over 600W to the CPU if needed. The DrMOS II are also hidden under here, which gives the board double temperature protection – a warning at 115ºC (LED on board and software in OS), and an automatic shutdown at 130ºC.
Due to the price point and size of this board, we have eight DIMM slots (two per channel) as we would expect, though the position of the heatsinks does limit orientations of large CPU air coolers somewhat. If only four sticks of memory are entered, they do not use the nearest DIMM slots to the CPU, giving a little extra horizontal room. We have six fan headers on board – one CPU 4-pin to the top left of the socket, one 4-pin SYS just inside the right bank of DIMMs towards the middle of the board, one by the 24-pin ATX power connector, one on the bottom of the board, one to the left of the PCIe (blocked by a third GPU), and one to the left of the DIMMs. These can be controlled by the BIOS and in the OS.
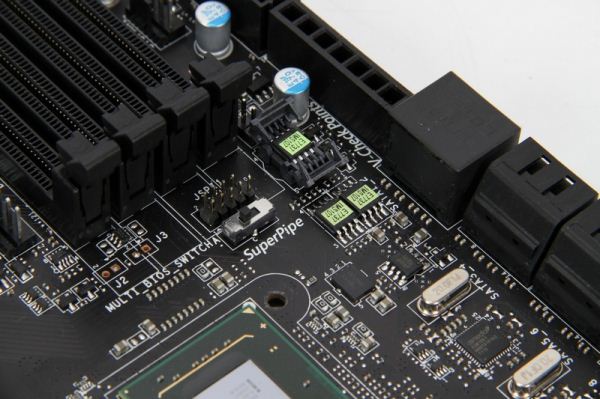
Unlike other boards, the on-board power and reset buttons are in completely different places. The power button is situated in the top right, whereas the reset button is located along the bottom next to the ‘DirectOC’. Typically we see these features together (I would assume to aid in the internal routing) in either one of those spaces. The reset button location caught me off-guard while overclocking a couple of times – more on that later. Beneath the power button along the right hand side, below the 24-pin ATX connector is a series of easy-to-use voltage read points for testers and extreme overclockers. This is always a handy feature on a top end board – if it were on anything cheaper, I wouldn't hesitate to suggest it adds un-necessary cost for 99.9% of users, but it is more than appropriate on the Big Bang-XPower II.
Just to the side of the voltage check points are a couple of features worthy of mention. MSI has equipped this board with an easy to replace BIOS system, allowing users who have distinct BIOS issues to replace the BIOS with no hassle. The Big Bang-XPower II already has a MultiBIOS system (that is, two BIOSes); however this system allows the user to replace one BIOS in case it goes absolutely wrong. Through my extreme overclock testing, I had several issues which caused the board not to boot fully, so I changed to the onboard second BIOS and re-wrote the first BIOS, rather than perhaps lose the second BIOS as well. (Writing over a dud BIOS is surprisingly easy, as long as you can still get into the other BIOS and can reach to push the MultiBIOS button on board.)
In terms of SATA ports, in order we are treated to two SATA 6 Gbps from the PCH, then four SATA 3 Gbps, also from the PCH. The next two sets of two are SATA 6 Gbps powered by ASMedia ASM1061 controllers. Unfortunately, only the first six are RAID capable via Intel’s Rapid Storage Technology. Beneath these SATA ports is the USB 3.0 header (NEC Controller) at right angles to the board, wholly suggesting that front panel USB 3.0 is the order of the day – either by removing the rear panel bracket from the 3.5” USB 3.0 panel included in the box or through any new case USB 3.0 connector. Beside this USB 3.0 header is a 6-pin power connector, identical to the ones found in GPUs. The purpose of this is two fold – more (stable) power to the PCIe ports when more than two GPUs are used, as well as an additional grounding device. Beside these connectors is a non-standard two-digit debug LED, useful for boot errors.
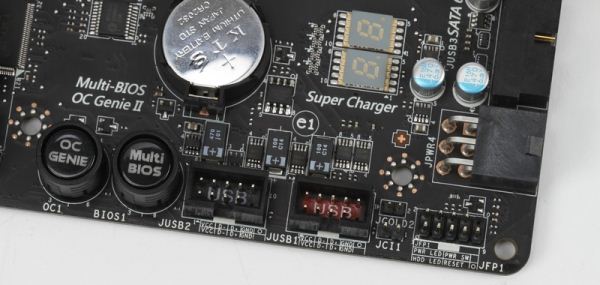
Along the bottom of the board, to start from right to left, we have the front panel header, two pin headers (one mentions JCOLD, so I assume it is a switch for sub-zero overclocking), two USB 2.0 headers (one of them designated the SuperCharger USB for quicker charging of USB devices), and a pair of interesting buttons – OC Genie and MultiBIOS. The OC Genie applies an MSI standard overclock to the CPU and memory (4.0 GHz and XMP, voltage bump) on boot and the MultiBIOS allows the user to switch between two BIOSes in case one is bad or if the user is an overclocker and has configured one or both BIOSes for specific benchmarks. Both of these buttons light up blue when depressed, just so you know they are definitely on.
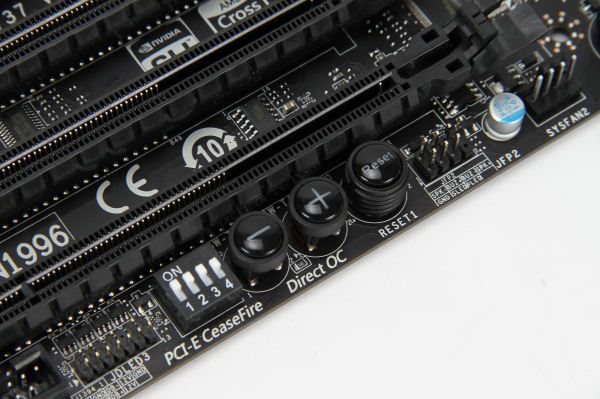
Continuing along the bottom of the board, we have a SYS fan header, another set of front panel pins (for buzzers and speakers), the onboard reset button, which is next to the two DirectOC buttons. The DirectOC buttons, when enabled in the BIOS, will adjust the base frequency of the CPU by ~0.1 MHz each press. However these are next to the reset button, which I did press accidentally on a couple of occasions, causing reboots. Next to the DirectOC is a series of DIP switches for controlling the PCIe slots (MSI has called this feature ‘PCIe Ceasefire’) – this is a feature we see on the high end overclocking boards, useful for determining PCIe problems or improving system stability, but most users need not worry about the feature. Along the bottom, we also have a Firewire header and front panel audio.
PCIe layout is easy to discuss – you get a lot of PCIe. Due to the extra length of this XL-ATX board over the standard ATX, there is room for seven PCIe slots. If they are populated with GPUs, the order becomes:
One GPU: x16/x1/-/x1/-/x1/-
Two GPUs: x16/x1/-/x1/x16/x1/-
Three GPUs: x16/x1/x8/x1/x8/x1/-
Four GPUs: x16/x1/x8/x1/x8/x1/x8
The four slots designated as GPU slots are PCIe Gen3 compatible, whereas the other three slots are PCIe Gen2 x1 slots. I assume that as the x1 are full length slots MSI has had feedback that suggests these are beneficial to those that use them. However, a board like this is unsuitable for GPU folders or simulators wanting to use more than four GPUs as the x1 limitation is quite severe (ideally, the x1 slots would have been multiplexed to x4/x4 with the x8 slots when occupied).
The IO back panel is pretty well organized – from left to right, we have a combination PS/2 port, two USB 2.0 ports, a clear CMOS button (which lights up blue), optical and digital S/PDIF outputs, a firewire header, four more USB 2.0 ports, dual Intel gigabit Ethernet, four USB 3.0 ports (blue), and standard audio jacks. For 99% of people, this covers almost all functionality. Areas for improvement (which perhaps other boards may include) are a wifi connector or a Bluetooth dongle – both of which may provide instability for overclockers but would increase the overall functionality of the board.
BIOS
If you cast your minds back to the P67 era last year, MSI had their first crack at graphical BIOSes. For the most part, it was extremely functional – settings were clear and well laid out. The main gripe I had with it however was the inclusion of so-called ‘games’ (a Breakout clone, the card game Pairs) which I learned were just low-resolution attempts to determine how capable the BIOS actually is. I also learned that the differing western and eastern markets are after different things in their products – whereas in NA/EU the drive is for more stability, functionality, and easy to use systems, in Asia the trend is for more gadget style trends or as one engineer put it, ‘cute’ systems. I am not sure how au fait that engineer was with the whole of MSI’s internal strategy, but that is what I was told.
Today, we have a very different system in front of us. The BIOS MSI has given us was the result of a design competition to find the best looking BIOS combined with ease-of-use and functionality. I have been told that the design we have actually came third in that competition, due to management looking at entries and also ability to program into a BIOS. Nevertheless it works extremely well and is as easy to use (if not easier) than some of the other top tier manufacturers.
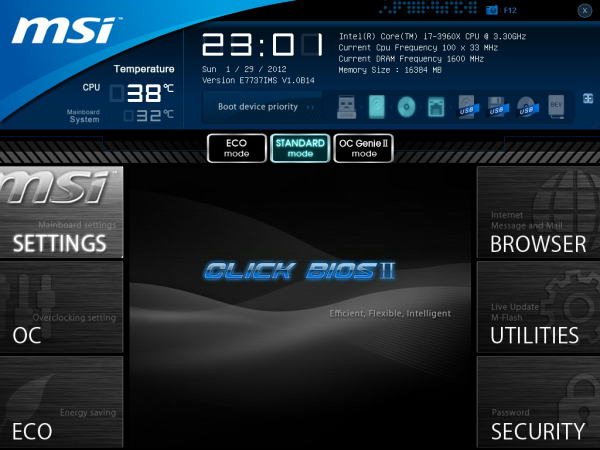
Along the top is a set of data every BIOS should have: CPU model and speed, BIOS version, memory size and speed, and CPU temperature, and these are constant throughout all the menus chosen. This is a shade away from ASUS’ implementation which includes fan speeds and voltages – both the ASUS and MSI also use a quick boot device priority selection.
Users have the choice of implementing ECO mode, which attempts to reduce power usage on the board, or OC Genie mode, which implements a MSI standard overclock (like the OC Genie button on the board). Alongside these options, enthusiasts wanting a larger overclock will keep it on Standard mode and use the various options as shown above.
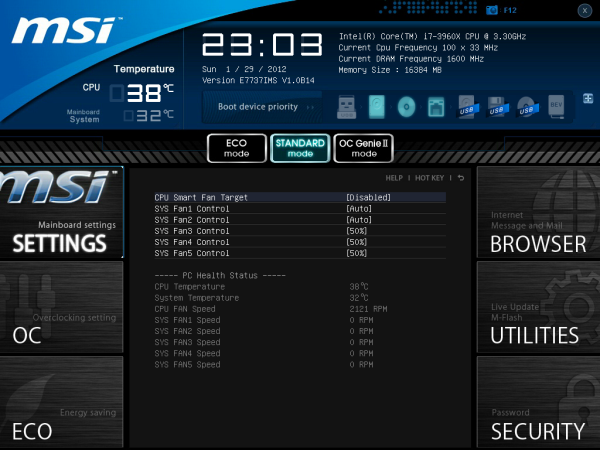
Fan controls are in the Hardware Monitor screen, where all the fan headers on board can be controlled. The options for fan controls are not as varied as we have seen on other vendor boards – only a simple percentage or auto setting is available, rather than the multi-ramp systems we have seen before. Usually, the level of control a manufacturer can give on a board is related to the fan controller used (and thus the price) and the speed at which the vendor can create applicable software for it. For a board that costs nearly $390, it is a shame that a better series of fan controllers were not used.
Updating the BIOS is relatively easy – insert any USB stick (FAT or NTFS) with the latest BIOS in the root folder, select Utilities -> MFlash -> USB -> BIOS file. The system will write the new BIOS over the BIOS selected with the BIOS Switch – not the BIOS the system was booted in to. So if a BIOS refuses to boot or reset, you can boot in the second, then while in the BIOS press the switch to select the first and overwrite the first BIOS with the MFlash tool. The system will power down, then the user has to power it up again – the new BIOS will then boot.
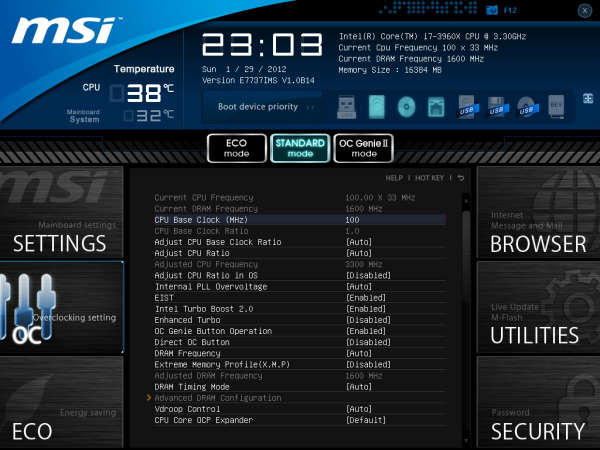
In terms of OC options, these are all bundled in the OC menu. If I was to be picky about any area of the BIOS, I would say that the OC options are not as neatly laid out as the rest of the BIOS. Nevertheless, the options are here, including base clock, CPU base clock ratio, CPU multiplier (ratio), memory frequency, memory timings, XMP, and voltages. One thing to note here is that if you change the CPU base clock ratio (i.e. the gear settings) to 1.25x, the base clock does not change with your setting – the base clock has to be manually adjusted to 125 MHz.
The Enhanced Turbo option in the OC menu may be enabled by default depending on the BIOS of the board. This setting in the BIOS gives the CPU an enhanced speed advantage at stock, by essentially overclocking the CPU to run at 3.9 GHz at any level of load (compared to Intel specifications of 3.6 GHz in full multi-threaded mode). For the purposes of the tests here, this setting was disabled, as it gives the board an unfair advantage in our tests, and with some BIOSes it is not enabled. However, this is just a CPU change – the OC Genie will give you that 4 GHz overclock and XMP settings with a single push of a button.
Overall, I am very impressed by this BIOS – it is easier to use than previous MSI iterations and performs well in comparison to other manufacturer implementations.
Overclocking
Given the build of the MSI Big Bang-XPower II, with its 22 phase power delivery, OC oriented options, and the price, I would expect some impressive overclocks from this board. The only obvious limitation from just looking at the board may be the design of those heatsinks, as they are not exactly the most efficient way of extracting heat from the area.
Automatic Overclock
With the OC Genie setting (either in ClickBIOS options, BIOS options or pressing the button on board) enabled, the board would default to a 4 GHz overclock on the CPU and XMP settings on the memory on the next boot. This sort of automatic overclock is rather conservative, considering other vendors have up to 4.5 GHz automatic overclock systems on their boards. But in this way, MSI are able to market the Big Bang-XPower II to system builders – 4.0 GHz is safe (you can pretty much guarantee all processors will do it if they can manage 3.9 GHz), and it is a one button solution. One thing to note is the voltage on this setting – the board set the CPU to 1.344 V, which is rather high. However the higher they set the voltage, the more processors will be stable, at the expense of increased heat and power draw.
Manual Overclock
As with previous reviews, our standard overclock methodology on X79 is to set the CPU VCore to 1.4 V, raise the power limitations where possible, and up the multiplier. The processor used in this test (i7-3960X) has previously seen 5125 MHz in extreme conditions, but in these reviews a target of 4.5-4.6 GHz at 1.4 V is often the standard.
With the MSI BBXP2, our limit was the 45x multiplier (4.5 GHz), which supplied 1.4 V constantly and hit 74ºC maximum during our Blender stability test – one of the lowest temperatures I have ever seen for this level of overclock. At the 46x multiplier, the system was stable during most tests, however would crash part way through the Blender stability test.
I then raised the base clock up to the 1.25x gear, to see if we could find any discrepancy. At this base clock, I was surprisingly able to push the CPU even further, as the 37x multiplier (37x and 125 MHz makes 4625 MHz) worked flawlessly at 1.4 V, with only 77ºC on the CPU during the Blender test. Though should users want to change the gear ratio, they should be careful to monitor what memory strap they are running, as 1.25x will apply a 25% overclock to the memory as well.
Memory Overclock
Using my G.Skill 16GB kit which is rated at DDR3-2400 9-11-11 at 1.65 V, I tested the level to which I could push the memory on this board at 1.65 V. The board is rated for DDR3-2400, which the board did perform when OC Genie was enabled. However, if I manually selected XMP in the BIOS (either XMP 1.2 or XMP 1.3), the board would not boot. By selecting the DDR3-2400 memory strap in the BIOS (and loose timings), again I was struggling to get into an OS. The DDR3-2133 setting did work though. This is a little surprising – I have seen boards rated to DDR3-2400 before but only for dual channel, and only DDR3-2133 in quad channel.
Just to confirm that XMP was working, I tried a different G.Skill 16GB kit rated at DDR3-1866 9-10-9 which performed flawlessly at XMP. This leads me to suggest that some optimization may need to be required for my higher rated memory kit to perform.
Extreme Overclock
In a new addition to my reviews, I will attempt to push the boards in terms of a more extreme overclock for most enthusiast users. Rather than a custom set up, I’m using off the shelf components – a Corsair H100 paired with a couple of Delta fans (AFB1212VHE) that I use for competitive air/water overclocking. While not the most extreme of liquid cooling setups, it actually does quite nicely.
Using an i7-3930K C2 processor, at 1.55V, I was able to achieve 5217 MHz on the CPU:
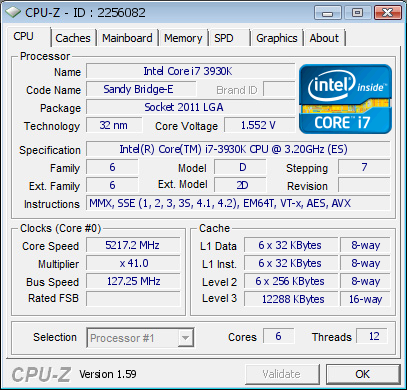
This setup was completely stable, although still a little warm on my setup, getting near 90ºC during the 3DPM test, where the CPU would start to throttle a little. For comparison, at 1.5 V I was able to achieve 5000 MHz (50x 100 MHz) with relative ease. The MSI BBXP2 has two advantages for this type of overclock – the voltage to the CPU is constant and accurate, and that the DirectOC buttons for adjusting the base clock help get those extra MHz without a reboot.
In The Box
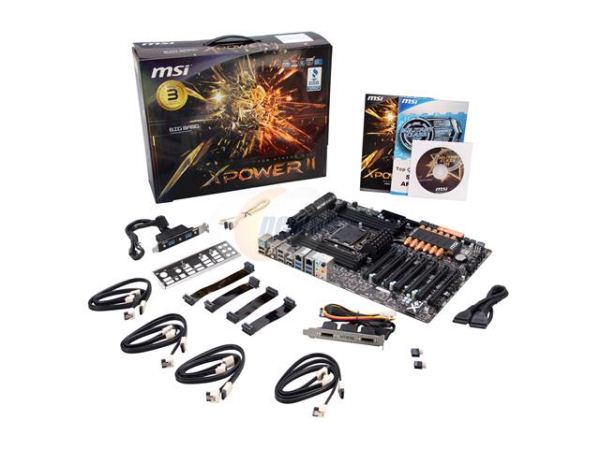
For a product that costs $390, we would hope for a bundle of accessories included in the box. MSI has heeded our call, and I am not disappointed:
Driver CD
User Guide
Software Guide (?)
IO Back Panel
USB 3.0 back panel / front 3.5” panel
Four flexible SLI connectors, various sizes
Front Panel easy connectors
8 SATA cables
eSATA back panel, power connector, and locking eSATA cable
Image courtesy of Newegg
First things first. The eSATA back panel looks like a great bit of kit, so I have to give kudos to MSI on this one. It is a back panel which connects into a 4-pin power and two SATA ports on board. This gives access to 4-pin power and two eSATA ports on the back. MSI has included a durable cable which transforms the 4-pin molex to two SATA power connectors outside the case, to connect to two SATA hard drives. Included is also an eSATA locking SATA cable, making quick work of any eSATA issues you may want at the back of your case.
Also of note is the Software Application manual – having a flip through, it takes you through all the software on the board, including Virtu which is not an X79 feature, which is odd. There are also internal references to iGPU, which may confuse some people. The manual also has not been updated for X79 and Military Class III advertising, as it sports a Military Class II front page. However it does go into more detail than I will below for covering the software on board, so could be worth a flip through if you want to get the most out of your MSI product.
Board Features
| MSI Big Bang-XPower II | |
| Size | ATX |
| CPU Interface | LGA2011 |
| CPU Support | Intel Second Generation Core i7 Sandy Bridge E |
| Chipset | Intel X79 |
| Base Clock Frequency | 100 MHz |
| Core Voltage | Auto, 0.800 V to 1.800 V |
| CPU Clock Multiplier | Auto, 12x to 60x |
| DRAM Voltage | Auto, 1.05 V to 2.445 V |
| DRAM Command Rate | Auto, 1T or 2T |
| Memory Slots |
Eight DDR3 DIMM slots supporting up to 128 GB Up to Quad Channel Support for DDR3, 1066-2400 MHz |
| Expansion Slots |
4 x PCIe Gen 3 x16/x8 3 x PCIe Gen 2 x1 |
| Onboard SATA/RAID |
2 x SATA 6 Gbps, Support for RAID 0, 1, 5, 10 4 x SATA 3 Gbps, Support for RAID 0, 1, 5, 10 4 x SATA 6 Gbps (ASMedia) |
| Onboard |
4 x SATA 3 Gbps (PCH) 6 x SATA 6 Gbps (2 PCH, 4 Controller) 6 x Fan Headers 1 x 6-pin PCIe CFX/SLI Power Connector 2 x USB 2.0 Headers 1 x USB 3.0 Headers Power/Reset Buttons + Debug LED 1 x Clear CMOS jumper 1 x Front Panel Audio 2 x DirectOC Buttons 1 x IEEE 1394 header 1 x OC Genie Button DIP Switches for PCIe Slots |
| Onboard LAN | Dual Intel (82579V and 82574L) |
| Onboard Audio | Realtek ALC898 |
| Power Connectors |
1 x 24-pin ATX connector 2 x 8-pin 12V connector 1 x 6-pin PCIe connector |
| Fan Headers |
1 x CPU Fan Header (4-pin) 5 x SYS Headers (4-pin) |
| IO Panel |
1 x Keyboard/Mouse PS2 Port 1 x Clear CMOS Button 1 x Optical SPDIF Output 1 x Digital SPDIF Output 4 x USB 2.0 6 x USB 3.0 2 x eSATA 3 Gbps 2 x Gigabit Ethernet 1 x IEEE1394/Firewire Audio Outputs |
| BIOS Version | 1.2 |
| Warranty Period | 3 Years |
In terms of features, we are very glad to see two Intel network controllers on board – they fit in nicely with where the board is in terms of price. Having a substantial number of SATA ports helps, although the ASMedia ports are not available for RAID according to the specifications. As I noted before, the audio is not anything special above MSI’s competition, but options like the DirectOC are a bonus for overclockers to have.
Software
MSI’s software for X79 is across a wide range of utilities:
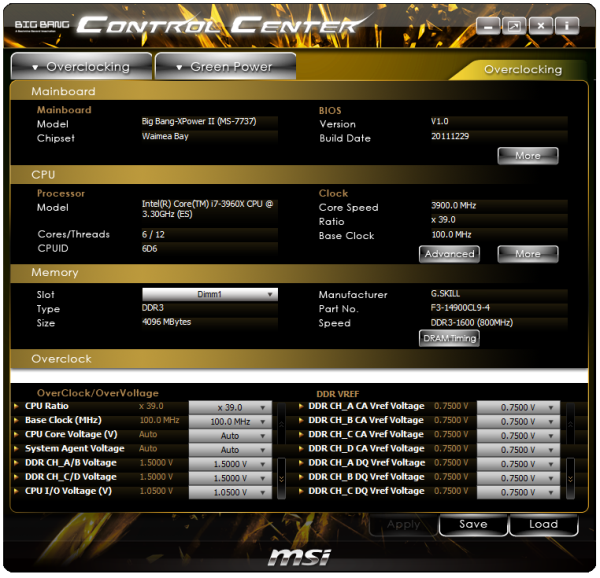
ControlCenter: A series of overclocking options (CPU Ratio, Base Clock, Voltage), green power options, and an option to turn the LEDs on the board off. To enable the features here, the relevant BIOS settings need to be enabled. In terms of changing the CPU ratio on the fly, the user is limited by the max ratio to which the board was booted. Changes here will directly affect BIOS settings as well. To be honest, while it looks nice, it could be laid out a little easier – MSI seem to have created this software on limited horizontal and vertical space, and thus have tried to cram everything in on as few screens as possible. It may be worth separating them across a few more to provide a better user experience.
SuperCharger: One of the USB headers on board has been altered to be able to provide 1.6 A rather than the standard 0.5 A, which allows USB devices to be charged quicker. However, this implementation requires both hardware and software to work in unison, so the MSI software calls the revised power configuration, allowing the user to use the SuperCharger mode when the computer is on or in a shutdown state.
Winki III: Do you ever feel you want to boot into a basic OS with limited functionality very slightly quicker than you can with a typical Windows installation on X79? If you did, then MSI has Winki III – a MSI developed Linux distribution providing update tools, internet browser, instant messaging, Skype, and a photo viewer. This was a feature MSI introduced a few chipsets ago, when taking 30+ seconds to get into the main OS was the norm. Now in the land of X79 and SSDs, it barely seems relevant. However, the option is there if it is needed.
Audio Genie: Provides speaker location settings and THX mode selections.
Video Genie: MSI’s Video Genie software aims to provide automatic color enhancement, saturation enhancement and intelligent gamma correction for static images and video playback.
Teaming Genie: With the use of dual Intel network controllers on the board, they are able to be teamed together to act as one connection with the throughput of both. This is enabled through the Teaming Genie software, which will also support additional suitable network connections as required.
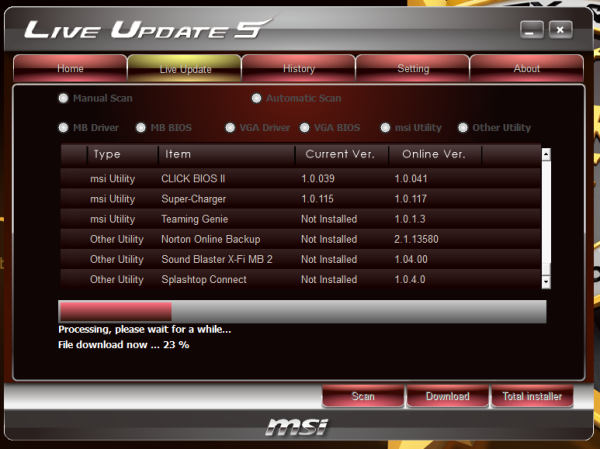
Live Update 5: MSI has handily provided a piece of software to aid in updating the MSI proprietary software – this is Live Update 5. I initially had issues running the version that came with the board; however the website has the latest edition. Through Live Update, the software will detect relevant software and drivers on the board, contact MSI’s servers, and inform you of updates. You then have the option of picking and choosing which ones to download and install. This is all well and good, although there is room for improvement – the system never informed me of the size of the files to be downloaded, or time to completion. So having to wait 30+ minutes for the system to download and update was a bit of a pain.
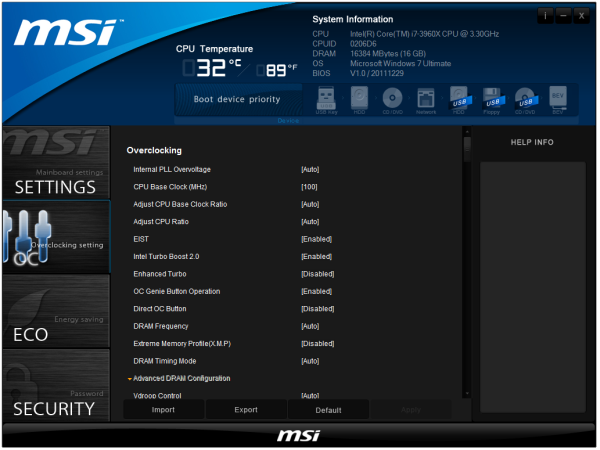
ClickBIOS II: As motherboard chipsets develop, so do manufacturers' ideas of how to support them. One current trend is to provide OS software which mimics the BIOS so users do not have to deal directly with the BIOS on boot. In MSI’s case, this comes into force through their ClickBIOS software. For all intents and purposes, the software represents a good facsimile of the BIOS itself with very minor changes in layout. The only major difference I have a gripe with is that in these systems the fonts always seem to look out of place. However, a user can interface with the BIOS settings via ClickBIOS with ease.
Test Setup
| Processor |
Intel Sandy Bridge-E i7-3960X 6 Cores, 12 Threads, 3.3 GHz (3.9 GHz Turbo) |
| Motherboards | MSI Big Bang-XPower II X79 |
| Cooling | Intel All-In-One Liquid Cooler, made by Asetek |
| Power Supply | Silverstone 1000W 80 PLUS Silver |
| Memory | G.Skill RipjawsZ DDR3-1866 9-10-9-28 1.5 V 4x4 GB Kit |
| Memory Settings | XMP |
| Video Cards |
XFX HD 5850 1GB ECS GTX 580 1536MB |
| Video Drivers |
Catalyst 11.8 NVIDIA Drivers 285.62 |
| Hard Drive | Micron RealSSD C300 256GB |
| Optical Drive | LG GH22NS50 |
| Case | Open Test Bed - CoolerMaster Lab V1.0 |
| Operating System | Windows 7 64-bit |
| SATA Testing | Micron RealSSD C300 256GB |
| USB 2/3 Testing | Patriot 64GB SuperSonic USB 3.0 |
Power Consumption
Power consumption was tested on the system as a whole with a wall meter connected to the power supply, while in a dual GPU configuration. This method allows us to compare the power management of the UEFI and the board to supply components with power under load, and includes typical PSU losses due to efficiency. These are the real world values that consumers may expect from a typical system (minus the monitor) using this motherboard.
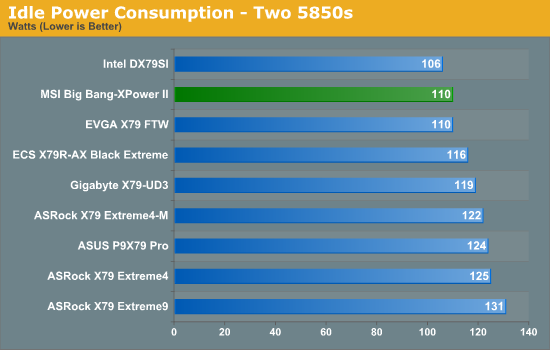
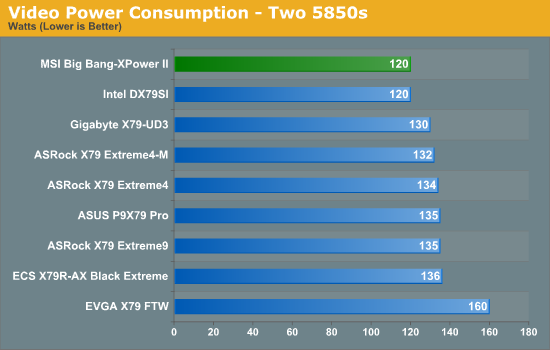
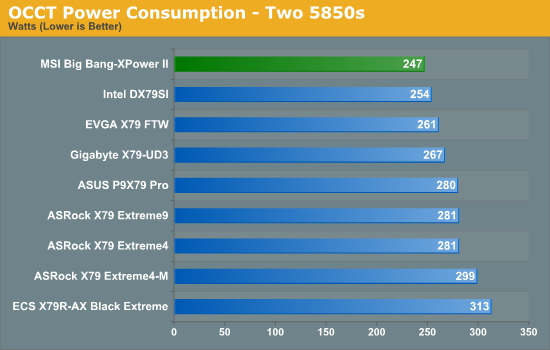
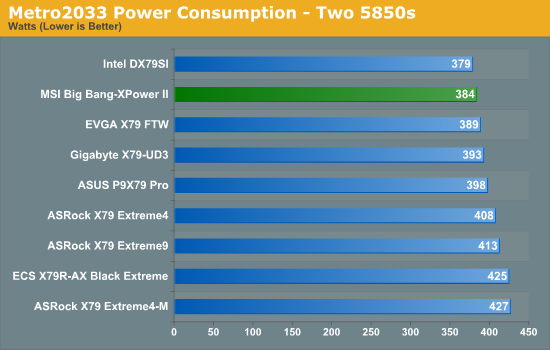
For an XL-ATX board, the MSI BBXP2 is spot on in its power consumption, being the most energy efficient (or the second most efficient) by default compared to other X79 boards tested.
CPU Temperatures
With most users’ running boards on purely default BIOS settings, we are running at default settings for the CPU temperature tests. This is, in our outward view, an indication of how well (or how adventurous) the vendor has their BIOS configured on automatic settings. With a certain number of vendors not making CPU voltage, turbo voltage or LLC options configurable to the end user, which would directly affect power consumption and CPU temperatures at various usage levels, we find the test appropriate for the majority of cases. This does conflict somewhat with some vendors' methodology of providing a list of 'suggested' settings for reviewers to use. But unless those settings being implemented automatically for the end user, all these settings do for us it attempt to skew the results, and thus provide an unbalanced 'out of the box' result list to the readers who will rely on those default settings to make a judgment. CPU Temperatures are not really indicative of quality or performance, even though one would postulate that worse parts may produce higher temperatures. However, if a manufacturer uses more conductive material in the power plane, this reduces resistance and increases the voltage at the CPU, causing a higher temperature but potentially better stability.
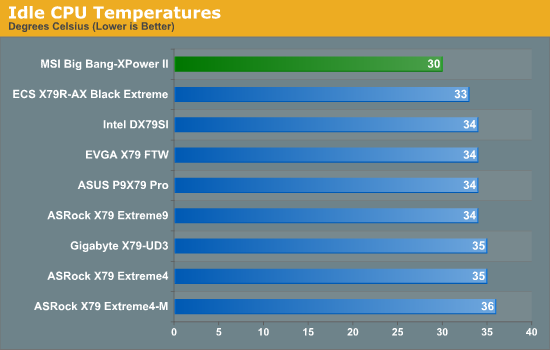
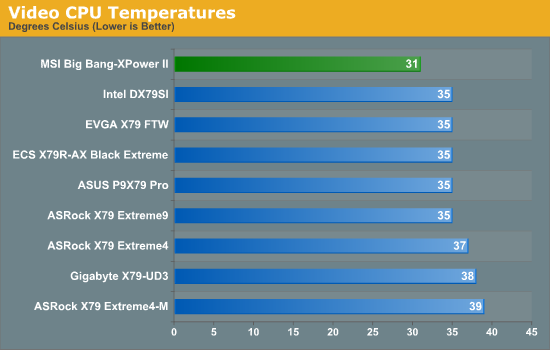
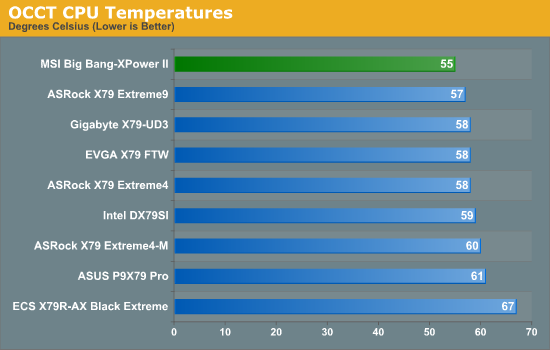
Impressively, the novelty heatsinks on the MSI seem to work wonders, producing our lowest ever CPU temperatures in idle, video and OCCT mode.
USB Speed
For this benchmark, we run CrystalDiskMark to determine the ideal sequential read and write speeds for the USB port using our 64GB Patriot SuperSpeed USB 3.0 drive. Then we transfer a set size of files from the SSD to the USB drive, and monitor the time taken to transfer. The files transferred are a 1.52 GB set of 2867 files across 320 folders – 95% of these files are small typical website files, and the rest (90% of the size) are the videos used in the Sorenson Squeeze test.
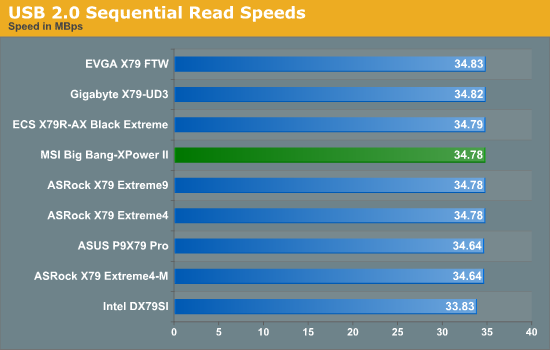
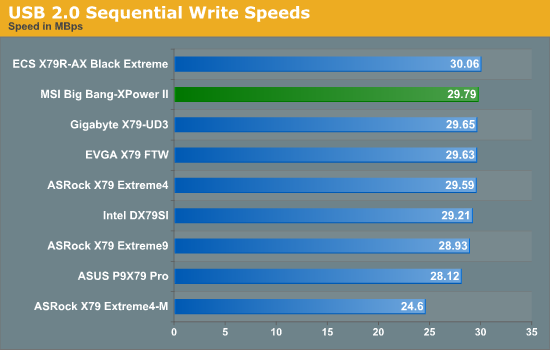
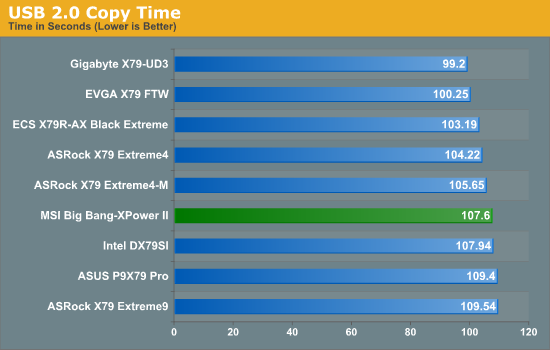
USB 2.0 performance is unfortunately nothing to shout about.
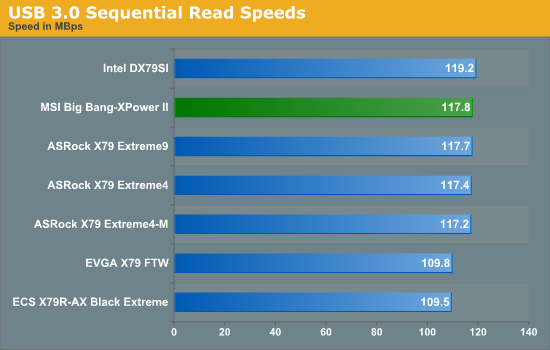
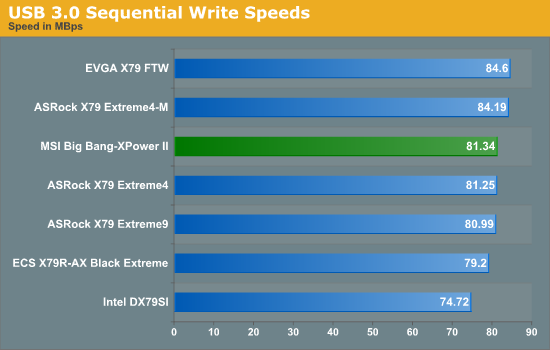
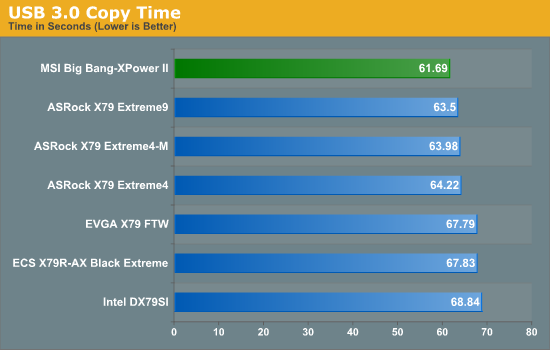
USB 3.0 performance however is the best BOT protocol performance we've seen (compared to ASRock's XFast and ASUS' USB Boost).
SATA Testing
We also use CrystalDiskMark for SATA port testing. The operating system is installed on the SSD, and the sequential test is run at the 5 x 1000 MB level. This test probes the efficiency of the data delivery system between the chipset and the drive, or in the case of additional SATA ports provided by a third party controller, the efficiency between the controller, the chipset and the drive.
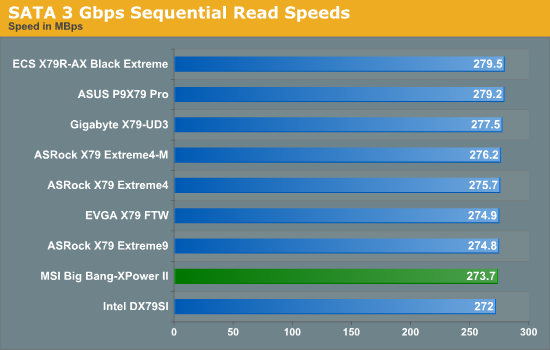
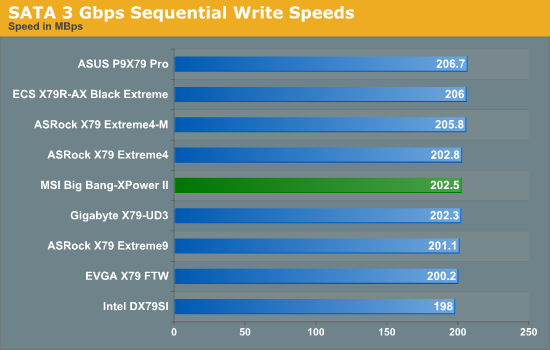
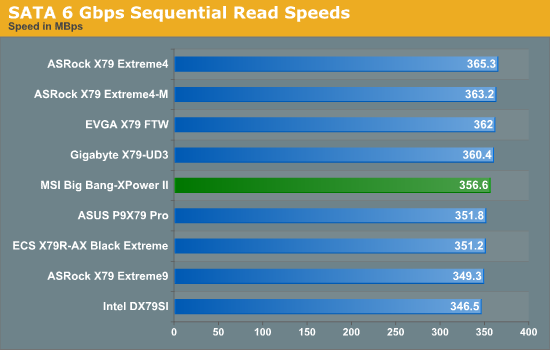
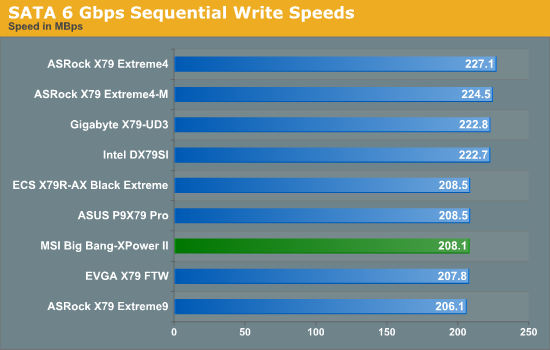
SATA performance seems nothing special when talking about sequential performance.
DPC Latency
Deferred Procedure Call latency is a way in which Windows handles interrupt servicing. In order to wait for a processor to acknowledge the request, the system will queue all interrupt requests by priority. Critical interrupts will be handled as soon as possible, whereas lesser priority requests, such as audio, will be further down the line. So if the audio device requires data, it will have to wait until the request is processed before the buffer is filled. If the device drivers of higher priority components in a system are poorly implemented, this can cause delays in request scheduling and process time, resulting in an empty audio buffer – this leads to characteristic audible pauses, pops and clicks. Having a bigger buffer and correctly implemented system drivers obviously helps in this regard. The DPC latency checker measures how much time is processing DPCs from driver invocation – the lower the value will result in better audio transfer at smaller buffer sizes. Results are measured in microseconds and taken as the peak latency while cycling through a series of short HD videos - under 500 microseconds usually gets the green light, but the lower the better.
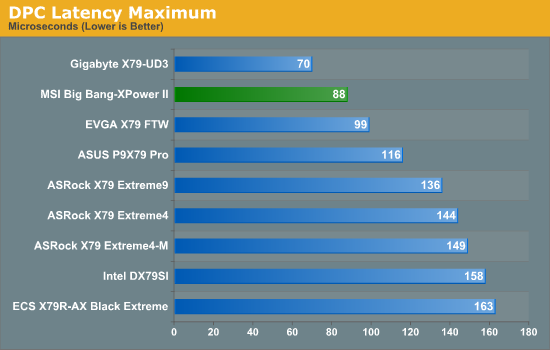
DPC performance is some of the best we've ever had, coming in at 88 microseconds.
3D Movement Algorithm Test
The algorithms in 3DPM employ both uniform random number generation or normal distribution random number generation, and vary in various amounts of trigonometric operations, conditional statements, generation and rejection, fused operations, etc. The benchmark runs through six algorithms for a specified number of particles and steps, and calculates the speed of each algorithm, then sums them all for a final score. This is an example of a real world situation that a computational scientist may find themselves in, rather than a pure synthetic benchmark. The benchmark is also parallel between particles simulated, and we test the single thread performance as well as the multi-threaded performance.
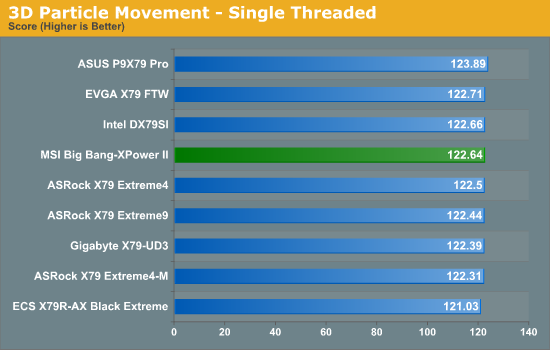
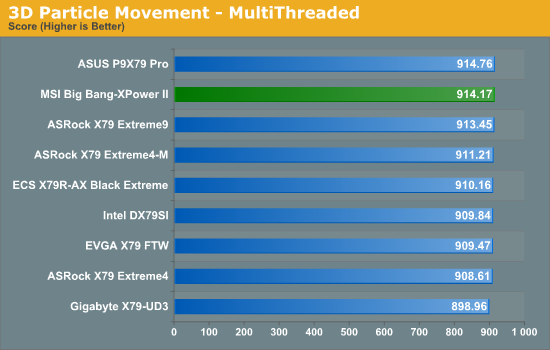
Both single and multi-threaded performance is in the top half of the table, however almost all boards are within statistical variance on both tests.
WinRAR x64 3.93 - link
With 64-bit WinRAR, we compress the set of files used in the USB speed tests. WinRAR x64 3.93 attempts to use multithreading when possible.
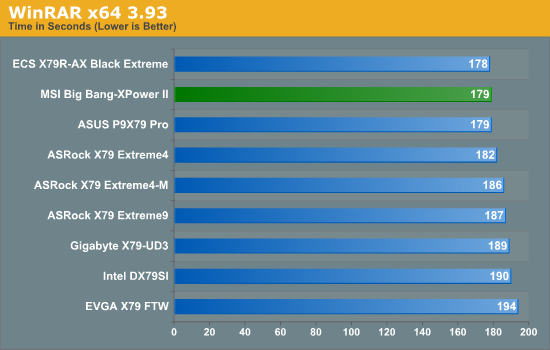
Impressively the BBXP2 does well on our WinRAR test, coming in at under the golden three minute mark.
FastStone Image Viewer 4.2 - link
FastStone Image Viewer is a free piece of software I have been using for quite a few years now. It allows quick viewing of flat images, as well as resizing, changing color depth, adding simple text or simple filters. It also has a bulk image conversion tool, which we use here. The software currently operates only in single-thread mode, which should change in later versions of the software. For this test, we convert a series of 170 files, of various resolutions, dimensions and types (of a total size of 163MB), all to the .gif format of 640x480 dimensions.
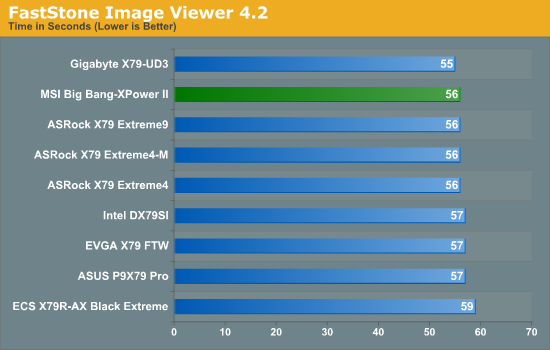
For our FastStone test, the BBXP2 joins a group of boards near the top in at 56 seconds.
Sorenson Squeeze 6.0 - link
Sorenson Squeeze is a professional video encoder, complete with a vast array of options. For this test, we convert 32 HD videos, each a minute long and approximately 42 MB in size, to WMV 512KBps format. Squeeze can encode multiple videos at once, one for each thread.
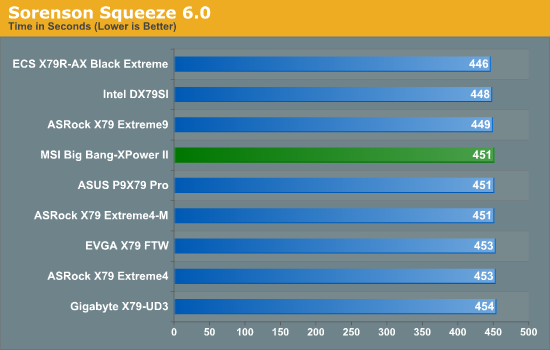
In our Squeeze test, the board is about average compared to others we have tested.
Aliens vs. Predator Benchmark
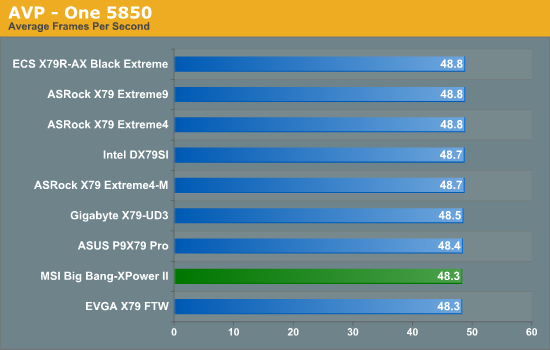
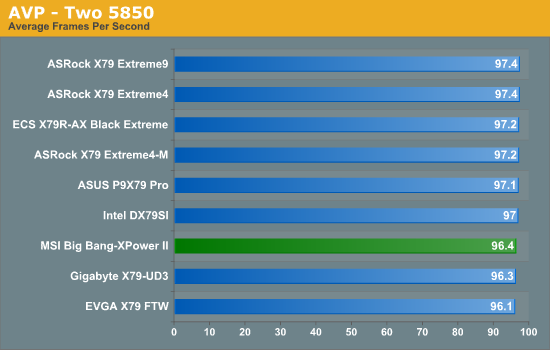
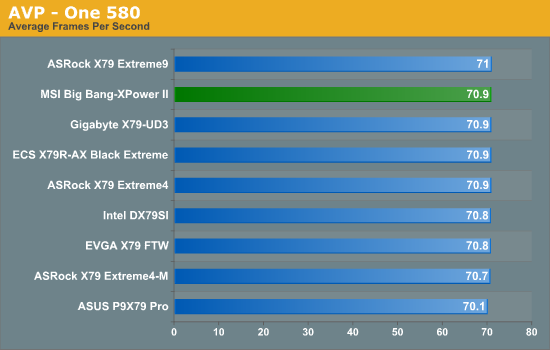
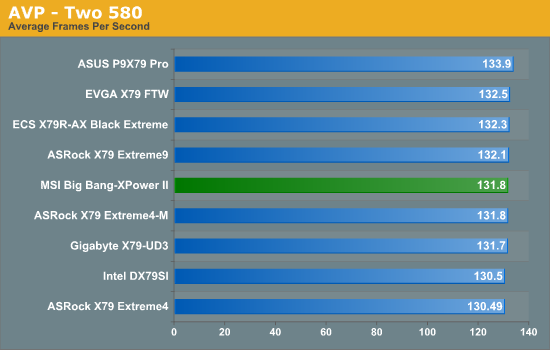
Aliens vs. Predator is a DirectX 11 science fiction first-person shooter video game, developed by Rebellion Developments. Available as a standalone benchmark, on default settings the benchmark uses 1920x1080 with high AF settings. Results are reported as the average frame rate across 4 runs.
Dirt 3
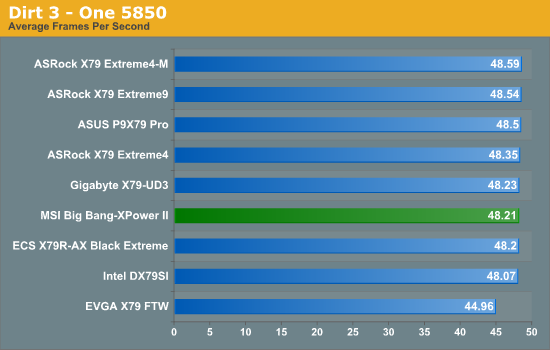
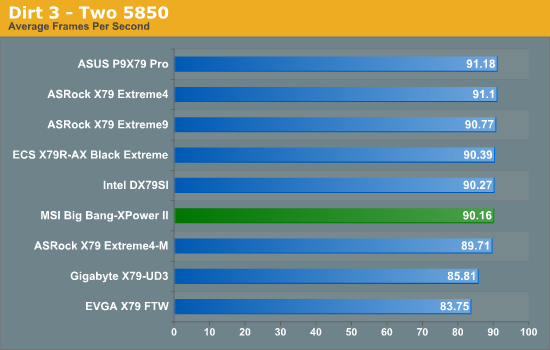
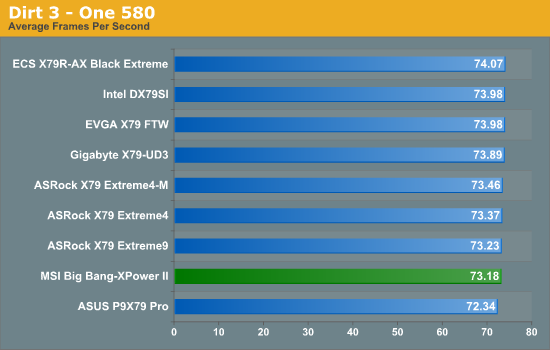
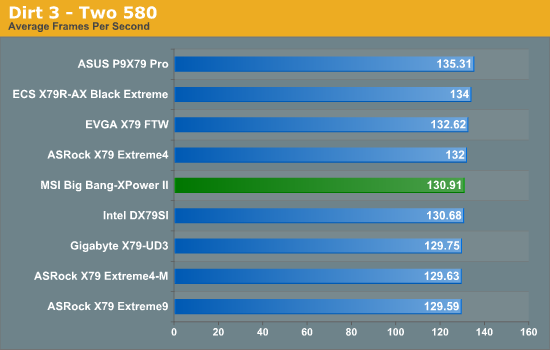
Dirt 3 is a rallying video game and the third in the Dirt series of the Colin McRae Rally series, developed and published by Codemasters. Using the in game benchmark, Dirt 3 is run at 1920x1080 with full graphical settings. Results are reported as the average frame rate across 4 runs.
Metro2033
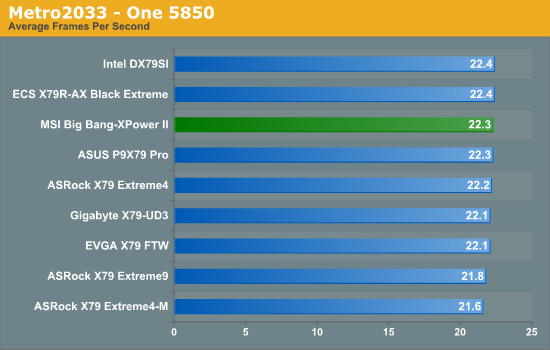
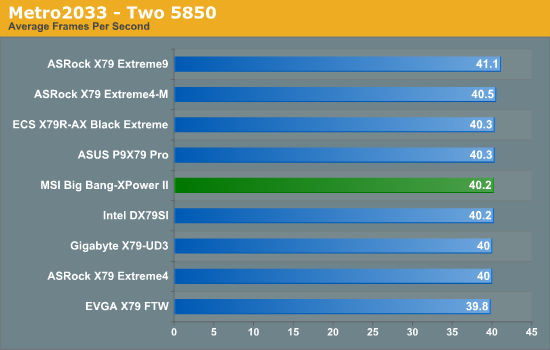
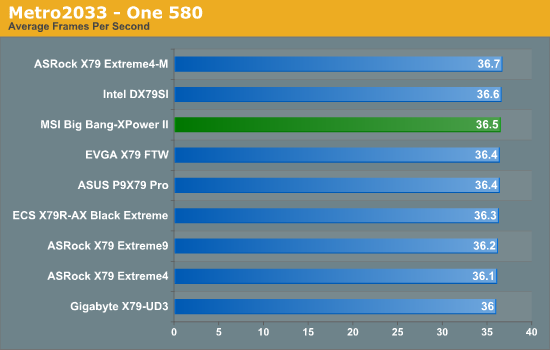
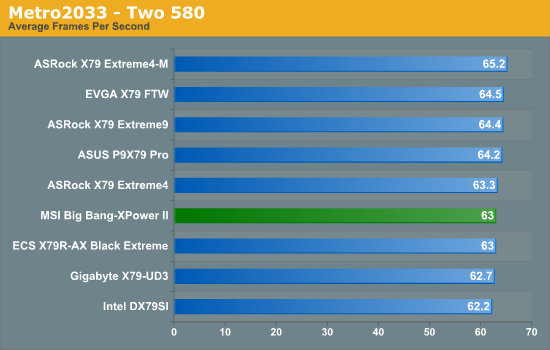
Metro 2033 is a challenging DX11 benchmark that challenges every system that tries to run it at any high-end settings. Developed by 4A Games and released in March 2010, we use the inbuilt DirectX 11 Frontline benchmark to test the hardware at 1920x1080 with full graphical settings. Results are given as the average frame rate from 10 runs.
GPU Conclusions
While the MSI Big Bang-XPower II doesn't light up any of our gaming tests, it's never far behind in any of them. Technically the worst result is in dual GTX 580s for Dirt3, where the board is in the middle of the pack at 130.91 FPS, compared to our best result of 135.31 FPS.
Final Words
From the start, $390 is a lot to spend on a motherboard, even in the land of X79. The whole range starts from as low as around $230, all the way up to $500 and beyond (if rumors of future models are true). For that money, you want function, performance, aesthetics, and an assurance that nothing will go wrong. MSI seem to have done well in light of this and have produced a good board.
For the XL-ATX form factor on the MSI Big Bang-XPower II, we get a total of ten SATA ports (four SATA 3 Gbps, six SATA 6 Gbps) and six USB 3.0 ports (four on the back panel, two via a header). Also on the board is a 22-phase power supply, 8 DIMM slots (two per channel), dual Intel network controllers, novelty heatsinks in the shape of a gun and a magazine, and seven full length PCIe slots which default to x16/x16, x16/x8/x8 or x16/x8/x8/x8 in multi-GPU mode. Along with power, reset and DirectOC buttons, the two-digit debug LED and rear panel clear CMOS, we have OC Genie which gives a 4 GHz overclock, and a button to switch between two BIOSes. The MSI BIOS is top notch, giving a very easy to use system for adjusting and updating, and the included software is quite good as well. The bundle includes a USB 3.0 front/back panel, a novel eSATA back panel, eight SATA cables and a variety of flexible SLI connectors.
There are downsides. The auto-overclock is a little too conservative, perhaps for the benefit of system builders, as it only raises the core clock to 4 GHz – other X79 motherboards either provide a range of automatic overclock settings or just go straight in at 4.5 GHz. The reset button is too close to the DirectOC button, meaning overclockers not paying attention could lose their overclock. The fan controls also are pretty basic, not allowing for any ramping or hysteresis.
The board has performed well overall, and if you picked on off the shelf, I doubt you would be disappointed, even if you ran it at stock. However, there are a lot of cheaper boards which would run just as well at stock, which brings into question the element of price. For $390, there is a lot of functionality here if you are willing to use it – quad GPU users or overclockers could happily use this board, or those requiring dual Intel network controllers.
In terms of the boards I have reviewed that are X79, the tour de force has been the ASUS P9X79 Pro, which currently retails for $320. This MSI is bigger (more multi-GPU capabilities), uses dual Intel NICs, more SATA ports, more in the box, just as easy to use, and ‘Military Class III’ components if that is important to you. However the ASUS has BIOS flashback, SSD caching, better fan controls, and has a more adaptive auto-overclock system.
Can we justify $70 for the brief summary of these differences? I think we can – these boards hit very slightly different types of enthusiast, and enthusiasts not explicitly wanting some of the unique features of other boards and have a bit of extra money should consider the MSI Big Bang-XPower II. It is a board with functionality that works, is easy to use, and should keep you happy with your build. If you're thinking of going X79 and picking up either an i7-3820 or i7-3930K, this motherboard could most likely be at the top of your price range, which is slightly unfortunate, but for i7-3960X users it does represent a good platform to base your build under.
 Would I recommend this motherboard, would I be happy using it personally on a day to day basis? Yes, I would. For overclockers or anyone who appreciates what the highest performance systems can offer, this motherboard delivers nearly everything we could ask for. As a result of this, I would like to award the MSI Big Bang-XPower II (X79) an Editors' Choice Bronze Award. The MSI Big Bang-XPower II provides a substantial package for anyone who wants to push the boundaries of the X79 platform at the $390 mark.

